Getting the Perfect Transition - IronPigeon takes notes while in Portugal with Tri Training Harder
Morgan Wesley takes notes from a Tri Training Harder transition session while on a training holiday in the Algarve.

Morgan Wesley and the Oxford University Triathlon Club enjoying the beach while on a training holiday with Tri Training Harder
In March, Oxford University Triathlon Club had the chance to go out to Portugal for a week-long camp with Tri Training Harder. One of the most valuable sessions on offer was a Monday morning full of transition drills, run by Head Coach Ed Brett. While the more experienced athletes from our group were out doing hard bike to run bricks, the novices amongst us (and one suspects all those shattered by the ride up Foia the day before) spent several hours dialing in our technical skills. As race season picked up a couple of months later, there was increasing demand for notes from those sessions, at which time I typed up what I remember from Ed.
Since then, I've had the pleasure of becoming one of Tri Training Harder's coached athletes and sometimes I even do them justice with my performance, but mostly, I manage not to drown or make a fool of myself. I also transition like lightning, thanks largely to these drills.
This article is, then, a combination of the transition skills session run by Ed Brett, one of the coaches at Tri Training Harder, prefaced by my own thoughts on transition as they've developed. All the drills included here have been tried and tested and, when done as a group scrambling to get bikes through a limited number of cones, mimics some of the madness of race day.
To start: we've all heard the importance of fast transitions and seen the countless columns about how to transition like the pros. Most of these articles give great tips and tricks for how to get your shoes on faster, keep your transition area clean and all agree that the key to great transitions is practicing all the little tips long before racing.
I'm sure that by now, we've all taken wetsuits off while fumbling with helmets or number belts, practiced getting on the bike as fast as possible, or frantically mashed our sweat sodden toes into our meticulously organized running shoes while tugging at whatever straps and tabs are available to give us a bit more leverage. We've got that down (if you don't, the second half of this article will go over individual drills that you can use on your own, or with friends!)
For now, lets look at what "transition" really is, and some of the common mistakes made, that have nothing to do with gear. Before we go on, ask yourself: what is Transition 1, when does it start, and when does it end? Now do the same for Transition 2. Ed posed this question to us in March, and its still one I return to when planning my race days.
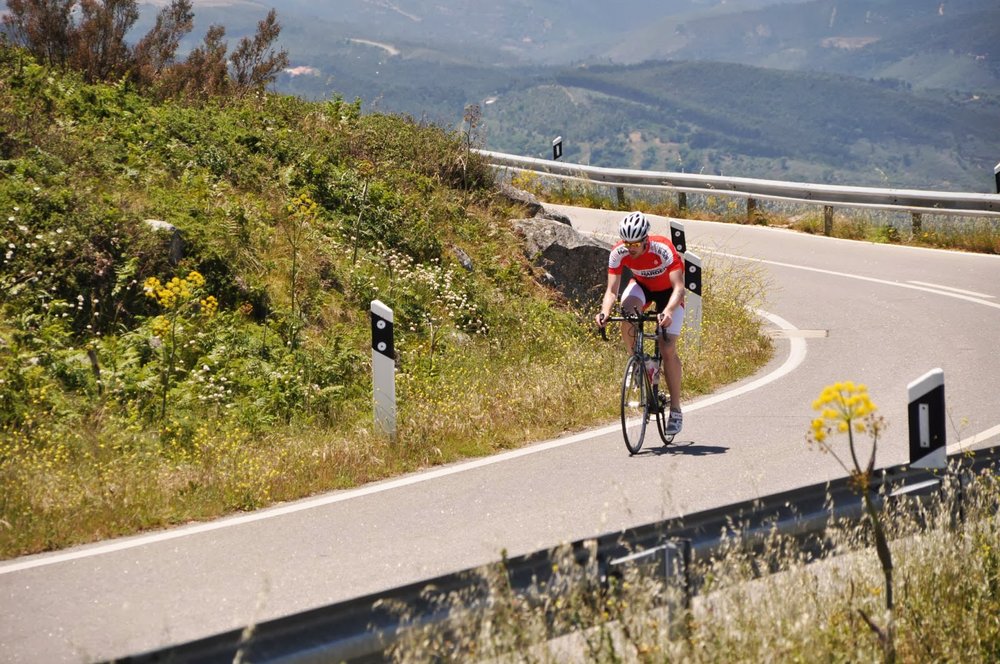
Morgan riding in the Algarve, chasing the Tri Training Harder coaches up the Monchique mountains
Transition: Not just a race split
It's easy to pay lip service to comments made by a coach, a trainer, or ones you read in a magazine before you experience them yourselves, and the following perspective on transition took a while to settle in for me. Ed's statement was simple, but its implications can be huge: Transition 1 ends when you are at race pace on the bike, not at any point before then.
I want to take that idea a little bit further, and talk about transitions both as a technical element of your race and as part of the entire experience of triathlon. Transition training becomes something more than just what happens between the timing mats, it involves using our brick sessions effectively and, ideally, it becomes integrated in the way we approach all our sessions.
Philip Hatzis removing his wetsuit following his meticulous transition plan.
Any time you are not actively at race pace, you are in the transition phase of triathlon.
While the official results record your Swim, your Transition 1 split, your Uber Bike split, Transition 2, and your Painful Shuffle split (I'm sure I'm not the only one who looks at the numbers this way after a race!) your body and your race don't have on/off switches at these points, you are constantly in motion towards the finish line. If it all flows together, you finish faster and stronger, if its punctuated, you lose momentum, and you lose time. All the drills in the second half of this article are designed to help you preserve your momentum, but lets briefly break down an entire race (and this is true for any length, from Sprint to Iron, though some of the mechanics may change).
Transitions start when you set up your bike and gear during racking. You lay the foundations for your entire race at this point, as well as defining how smoothly things will go. This means, you actually start your transitions the night before, when packing for the race. Check the weather, check the times, only take exactly what you need, and if there is anything you may or may not need, consider taking throw-away kit (I've got about 10 spare water bottles now, just to make sure I have one that I can put in my Bike Bag for longer races, full of electrolytes to sip after the swim if I'm cramping or dizzy).
As always, your priority is to get to the finish line in as little time as possible. You achieve this by training hard, racing to some kind of plan, and by minimizing the decisions you have to make on race day. Every decision costs you time, every moment you need to debate between two choices slows you down. Have a plan, execute the plan, be faster.
When you set up your transition area, put things on your mat in the order you will use them: Bike stuff in front, Run stuff in back. Put them down in the direction you will want them on race day (shoes with toes away from where you will stand, sunglasses in the helmet facing the direction you want them to slip onto your face easily, etc.) Take a moment to stand there and think about all the kit you have laid out and what purpose it serves and what order you'll put it on. There are no decisions to make during the race; you've already made them all.
Now...we race...join me in our first place finish of a sprint distance race...in our minds (I highly suggest doing this in a crowded cafe or locker room, and making sound effects).
We get in our wetsuits (or swim skins, since we're serious triathletes, we'll always have some 'go faster' kit on that needs to come off after the swim), do our warm ups, and find our place on the start line or in the deep-water mob. The gun goes off.
We swim to plan, we find feet, we breeze through the first 600m's of the course, and rounding the final buoy we see the exit gantry. This is where Transition 1 begins. We know that we've been horizontal for long enough that our bodies have started doing funky things with blood flow and pressure, our balance might be off, and the second we stand up, a huge amount of compressed blood is going to go rocketing into our legs.
1. Now is the time to start kicking harder, getting that blood down to the legs and already actively working to negate dizziness (a.k.a. the drunk swimmer's stagger) on the way to the Transition area. Just before we hit dry land, we reach up and open the neck of our wetsuit to flood it with water, unsealing it from our bodies and making it vastly easier to remove.
2. We're out of the water and running to our bikes, we undo the zipper on our wetsuit and strip it off our arms, down to our torso. We do this with the same motions (figure out what these are, practice them, over and over. Same arm first, same timing for taking off goggles / swim cap / fiddling with watch, etc. Remove all choices).
3.
[Helmet and Shoes Drill]
We've arrived at our transition mat and while we stomp off our wetsuit, we lift our helmet off our handlebars (or out of our Bike Bag, for those Ironman folks) and put it on, while using our legs to get the wetsuit as far off as possible. We then reach down and use our hands to free our ankles / feet from the suit (again, practice, same foot, same pattern, each time). We place our wetsuit on the mat, put on our race belt, and then grab our bike. The process looks like this:
a) Helmet on with hands / Wetsuit low with feet
b) Fasten Helmet
c) Reach down and take off Wetsuit
d) Fasten number belt on back
e) Grab sunglasses / other bits
(A note here for people racing in colder weather: Putting on things like arm warmers with wet arms is almost impossible. Consider this: if it's raining, any kit that you put on is going to get soaked almost immediately. Why not put your arm warmers etc. on before the swim, under the wet suit. If the rain stops, the air will dry them quickly and you'll not lose time on them. Many of the pros and top age groupers at Ironman UK 70.3 this year used that strategy to excellent effect).
ONLY THEN DO YOU TOUCH THE BIKE. Build this pattern into your daily ride sessions. You do not touch the bike until you are ready to take it outside and get on it. Helmet on and fastened, sunglasses in place, kit ready. Never ever touching the bike beforehand. It might seem a bit silly, but if it avoids a DQ or time penalty on race day, it's a fantastic habit to build.
We then run to the mount line, guiding our bike by the saddle, weaving past other competitors on our way to glory.
[Bike Handling Drill 1 / 2]
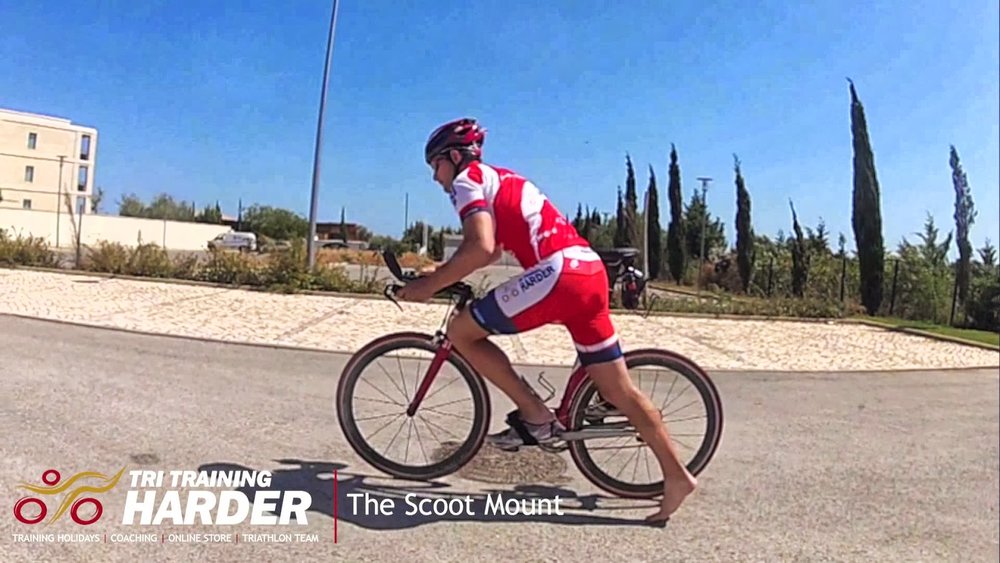
After we get to the mount line, we keep moving with the bike to the first clear area of pavement available to mount. This is critical. There is no sense stopping at the mount line and getting on your bike if there are fourteen other people fumbling around there and falling over in front of you. The net speed gain over just running / scooting your bike to a clear patch is zero. Get clear and then mount. Ideally, we have practiced the time-honored art of the flying squirrel and just dive onto our bike and go, but in reality, it's probably best to land one foot on the pedals and scoot until it's clear. [
Bike Handling Drill 2 / Bike Mounting Drill 1]
Once you're in a clear area, you finish scooting, swing the other leg over and engage both pedals. You should be in an easy gear as you spin up to race speed. You slip feet into shoes / do up straps etc. as needed at this point, slowly building speed up to pace. And then once you're settled, you begin your bike leg. Geographically you might even be a full kilometer out of transition, but you've only just fully finished the changeover from the swim to bike. It covers a huge amount more ground than the timing mat would suggest.
[Bike Mounting Drill 1 / 2]
1. Coming back in from the bike, the process reverses; you undo your Velcro, get your feet on top of your shoes as you slowly drop off your speed and get ready to dismount. Again, coming in fast, fumbling to get off your bike, possibly crashing will always cost you more than a slower, controlled entry. If it doesn't cost you time immediately, the physical cost of sudden stops / accelerations are always higher.
2. Swing your leg over into a scooting position well before transition and guide the bike in, ready to hop off and run with it for the last couple meters if there is a traffic jam at the mat (this is incredibly frequent if you're doing wave starts and are in an earlier wave. Not only do you get other riders dismounting in front of you, but also all those later waves are trying to get on their bikes and out onto the course).
3. You run your bike to the rack, set it in its place, and reverse the helmet / wetsuit process. You slide your feet into your shoes while unfastening the helmet, you set the helmet on your handlebars, and then you reach down and finish pulling on the shoes. You rotate the race number to the front, you grab any other run essentials, and then you are out onto the course. [Helmet and Shoes Drill]

dismounting with style in Kona
Bike onto rack
Helmet unfastened / Toes into shoes
Helmet on bike
Reach down to pull shoes on
Rotate race number
Last items
Run
At that point, it's all over but the winning, your margin of victory over the nearest competitors turned into a maddening gulf by your lightning fast transitions.
Now, let's look at the specific drills that can help get us there. Remember, these are all great for general guidelines, but specific races will require a bit of jigging about, which needs to be planned for (such as learning how to throw your bike at a poor volunteer at an Ironman finish line without simultaneously tripping yourself / impaling them as you rocket in at 27mph).
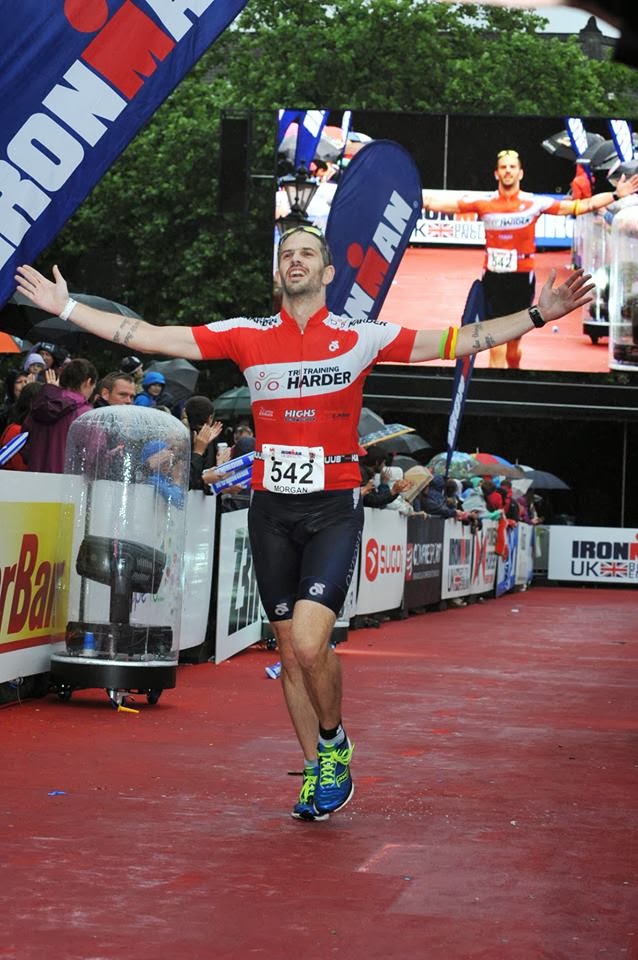
Triumphant finish after a long race with some quick transitions!
Drills:
Things you will need:
Must have:
100 count bag of thin elastic bands (rubber bands for North Americans)
Cones / Large Stones to dodge (6 is enough)
Bike
Race Shoes (cycling and running)
Helmet
Humility and a sense of Humour
Ideally:
Elastic laces
Race belt (with an old number on it, just to practice making sure its in the right place)
Run while holding the bikes seat to increase speed and control
Bike Handling Drill 1
: Guiding the bike with one hand on the saddle only. Remember, if the bike is upright and moving, it will stay on a straight course and you can steer by tilting the bike left or right.
a) Start with a fast 30m out and back running on the side of your bike you will mount from.
b) Cones! Set up 5 or 6 cones each a bit less than a bike length apart (you can move them closer together to make things harder). Practice winding the bike through them as fast as possible without touching anything other than the saddle.
Bike Handling Drill 2
: At this point, you can control your bike in transition! Congratulations, on to the next element of things: Scooting the bike. Scooting is one of the key pieces of transition, because while you "can" mount your bike fully at the mount line, no rule says you "have" to. While scooting you have far more control to maneuver than you do during the full mounting process. Scoot to a point that is clear of obstacles and interference and then mount fully.
a) With your dominant foot on bike (whichever foot you clip in first) kick off and use your off foot to scoot like a skate board (I'm going to use Left for dominant foot, right for off, since this will be easier to write).
1) 30m out and back
2) Through the cones, using your hands to guide the bike with the scoot propelling you in the right directions. Do this until you are absolutely comfortable scooting.
3) Scoot through the cones, then immediately swing your right leg over to mount, ride back.
watch the experts
Bike Mounting Drill 1
: This is where you get to put all the skills together. First, sort out proper fastening of shoes to the bike with elastic bands, it's going to be different for every pair of shoes / bike setups, so you'll have to fiddle a bit, for these next drills, you only need to fasten your Left shoe, the right can dangle, at a race, fasten both.
The basic fastening procedure is thus: take thin elastic band, break it in half, tie the shoe in a horizontal position to the bike (bottle cages / chain catch seem to work well for this for most bikes) near the front of the pedal stroke. This positioning will allow you to slide your foot into the shoe and immediately push forward and down on it, starting your motion and allowing you to scoot or mount.
a) Practice running the bike forward by the saddle, then moving to just getting your foot in and scooting straight with a mount at the end (this is surprisingly difficult to do without a major pause to aim the foot) yes, you move your hands from the saddle to the bars before the mount, please god don't try to do it while holding the saddle!
b) Spread the second half of the cones further from each other. Saddle-guide the bike as fast as possible through the first half, then half mount and scoot through the rest, finishing the mount on the other end.
Bike Mounting Drill 2:
The other foot. Since your Left foot is already in the shoe, all that needs to be done is secure your Velcro straps. The Right foot can present a number of other challenges. If the elastic holds and things go right, your foot will basically slide in as you mount the bike, and away you go. If it doesn't hold, you're left with a shoe dangling down! There are several easy solutions for this in the transition stage.
1) Place your foot on top of the shoe, use it like a pedal and ride out of the transition chaos until you are in a place where you can reach down to grab the loop and get your foot in. Note, that you'll likely have fastened down the Velcro by standing on it, so unstrap it, grab the heel hoop, slide foot in.
2) The kick spin. One of the beauties of clipless pedals and tri shoes is the way they hang vertically. If you kick the toe of the shoe gently, it will swing like a pendulum. With a little practice you can give it a kick, start it swinging, and then catch it with your toes on its upswing. Foot goes in, voila.
Helmet and Shoes drill:
This is a bit of an all purpose drill, since you can practice using your feet to get shoes on / off like you might have to deal with a wetsuit.

attaching shoes to your bike with elastic bands holds your shoes in place which saves seconds in transition

an example of shoes held in place with elastic bands
Alternating repetitions of:
a) Helmets on the ground, shoes on....run 20m to the helmet, put helmet on while removing shoes without hands (like kicking out of a wetsuit) then run barefoot back to the starting point.
b) Shoes on the ground, helmet on...run to your shoes and get them on while unfastening your helmet and placing it on the ground (don't just drop or chuck your helmet down!) As soon as they are on and fastened run back to the start (if you're not using elastic laces, you MUST tie your shoes before running back to the start).
c) c) Repeat, preferably while racing friends. If you plan to use things like fuel belts and visors, place them at the transition point to practice.

do not touch your bike until your ready to go!
For some rather brilliant Tri Training Harder videos, designed for people who have not been lucky enough to enjoy a Tri Training Harder transition session in Portugal, check out the Tri Training Harder YouTube channel and watch the vids below.
Practice the drills, stick to your plan and you will be on top of the world (at least in triathlon terms!)